


How to Clean Your Projector Screen Without Ruining It
A clear, vibrant image requires a clean surface. But if you treat your projector screen like a window or a TV, you might destroy it in seconds.
There is a reason online forums are full of horror stories about "permanent streaks" and "shiny spots." Projector screens—especially the high-tech Ambient Light Rejecting (ALR) screens used with Laser TVs—are optical instruments, not just white fabric. They have microscopic coatings that can be stripped away by common household cleaners.
STOP. Put down the Windex. Put down the paper towels.
Whether you are maintaining a standard matte screen or a premium AWOL Vision Motorized Floor Rising Screen, this guide will show you the only safe ways to clean your screen.
Know Your Screen Material First
Before you touch the surface, you must know what you are dealing with. The cleaning method depends entirely on the "grain" and technology of the screen.
Standard Matte White
These are often found in dedicated dark rooms.
- Texture: Flat and uniform.
- Durability: Moderate. You can usually wipe in any direction, but they are porous and can absorb oils.
- Best Use: Ideally paired with a standard projector in a dedicated dark room. (See our guide on projector screens vs. walls).
Premium ALR / CLR Screens (The "Delicate" Ones)

If you have an AWOL Vision Cinematic+ or Fresnel Daylight screen, you are dealing with high-performance optical technology.
- Texture: They are NOT flat. They use a microscopic structure to block ambient light and reflect projector light towards your eyes.
- The Golden Rule: You must NEVER wipe vertically or in circles. Scrubbing against the grain will flatten the ridges, ruining the contrast and permanently damaging the ALR vs CLR technology.
The "Forbidden" List
If you use these, you will likely void your warranty and ruin the image quality.
- Standard Glass Cleaners (Windex): The ammonia breaks down the optical coating.
- Paper Towels: They are made of wood pulp and will scratch delicate ALR surfaces.
- Tap Water: The minerals leave white "rings" when they dry.
- Bleach or Harsh Solvents: These will bleach the screen, creating a permanent bright spot.
- Magic Erasers: These are abrasive sandpaper. They will sand the texture right off your screen.
The Tools You Actually Need
- High-Quality Microfiber Cloths: You need at least two—one for wet application, one for drying. Ensure they are clean and lint-free.
- Distilled Water: Essential for preventing mineral deposits.
- Mild Dish Soap (Optional): Use only if water doesn't work. Mix a ratio of 95% distilled water to 5% soap.
- Compressed Air: For dust removal (hold the can upright and at a distance).
Step-by-Step: The Dry Method (Routine Maintenance)
Frequency: Once a month
Dust is the enemy of brightness. A layer of dust acts like a filter, dimming your image.
- Inspect the Surface: Turn off the projector and use a flashlight to see where the dust is settling.
- Air Dusting: If you have a can of compressed air, give the screen a few short bursts from 6+ inches away. This dislodges debris without touching the surface.
- The Gentle Wipe: Take a dry microfiber cloth and lightly glide it across the screen.
- Crucial for AWOL Vision Screens: Wipe horizontally (left to right). Follow the direction of the screen's structure. Never wipe up and down.
Step-by-Step: The Wet Method (Stains & Accidents)
Frequency: Only when necessary
Did a bug fly into the screen? Did a child touch it with sticky fingers? Here is how to fix it without panic.
- Prepare Your Solution Mix your distilled water (and tiny drop of soap if needed) in a bowl.
- Dampen, Don't Spray Never spray water directly onto the screen. Dip your microfiber cloth into the water and wring it out until it is just slightly damp.
- The "Dab" Technique If there is a stuck object (like a bug), gently press the damp cloth against it to re-hydrate it. Let it sit for a few seconds to soften, then lift it off. Do not scrub.
- The Horizontal Wipe Gently wipe the affected area using a side-to-side motion.
- Warning: Do not press hard. You are cleaning the surface, not scrubbing a floor.
- Dry Immediately Take your second (dry) microfiber cloth and gently dry the area, again using horizontal strokes. This prevents water spots from forming.
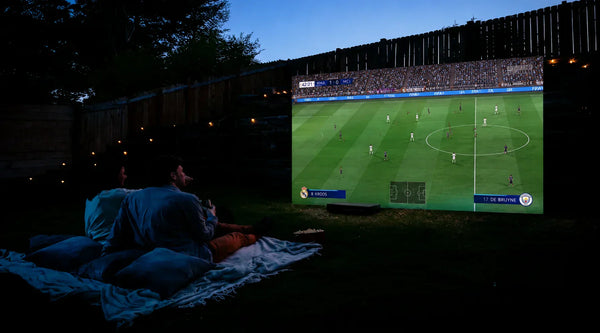
The Ultimate Prevention: Retractable Screens

The best way to clean a screen is to never get it dirty in the first place. This is the hidden advantage of Motorized Floor Rising Screens.
Unlike fixed-frame screens that sit on your wall collecting dust 24/7, AWOL Vision’s Floor Rising Projector Screens retract into a protective housing the moment you turn off your movie.
- Dust Protection: The screen is sealed away when not in use, meaning you rarely (if ever) need to dust it.
- Kid & Pet Proof: It removes the temptation for children to touch the screen or pets to scratch it when you aren't in the room.
Which Screen Material is Easier to Maintain?
Knowing your screen type helps you protect it. AWOL Vision offers two main technologies:
- Cinematic+ (Lenticular): This screen features a microscopic "ladder" structure that blocks 95% of overhead light, giving you deep blacks in rooms with ceiling lights. Because the structure runs horizontally, you must be extra careful to only wipe left-to-right to avoid damaging the ridges.
- Daylight (Fresnel): This screen uses concentric semi-circles to block light from both the top and sides. It is significantly brighter and perfect for living rooms. While its surface is slightly more rigid than lenticular screens, the "No Circular Wiping" rule still applies strictly to preserve its high-gain coating.
Final Thought: A "Clean" Setup Starts with Habits
- The "No Touch" Rule: Educate your household (and guests) that the screen is a "No Touch Zone." Oils from fingers are the hardest stains to remove.
- Cover the Screen: If you have a portable or floor-rising setup, store the screen in its case immediately after use.
- Check the Lens First: Before you clean the screen, check your projector lens. Dust on the lens often looks like spots on the screen. Keeping your lens clean prevents you from scrubbing the screen unnecessarily.
Now that your screen is pristine, it’s time to enjoy the movie. Need inspiration? Check out our guide to watching theater movies at home.
Frequently Asked Questions
How do I remove oil or fingerprints?
Oils are stubborn. You will likely need the 5% soap mixture mentioned above. Be extremely gentle, as scrubbing oil can spread it into a larger smudge. Once cleaned, consider reminding your family why you shouldn't touch the screen.
Can I use alcohol wipes?
No. While some vinyl screens can tolerate alcohol, modern ALR/CLR materials often react poorly to it. It can strip the reflective coating. Stick to distilled water and mild soap.
My screen has a "dent." Can I iron it?
No. Projector screens are tensioned. If you have a dent or a crease in a fixed-frame screen, you may need to check the tension springs on the back frame. For help with setup, see our guide on how to hang a projector screen.

Be the First to Know
Subscribe for special deals, news, and important product information, and get your exclusive $50 discount.
Related Articles
Basement Theater: How to Turn Your Basement Into a Home Cinema
10 Small Home Theater Ideas That Make Every Inch Count
Dolby Audio Explained: What It Means for Your Home Theater
How to Connect an iPhone to a Projector: A Step-by-Step Guide (Wireless & Wired)
How to Reset Chromecast: The Ultimate Troubleshooting Guide