


How to Make Your Projector Brighter
Is your projector image failing to impress? Whether it looks dim, colors seem faded, or the picture simply lacks the "pop" you expected, you've come to the right place. Achieving a stunning projected image is a nuanced science, but it's one you can master.
This guide moves beyond simple tips. We will explore the foundational principles of light, unpack the technology inside your projector, and reveal how the right environment and screen combination can unlock a level of performance you may not have thought possible. Prepare to see your projector in a whole new light.
What Is Brightness: Perceived Quality
The first step to a great image is understanding how brightness is measured and perceived. The market is full of confusing specifications, but for a trustworthy and accurate measure of performance, the international standard to look for is ISO 21118, which gives a rating in ISO Lumens.
Unlike vague marketing figures, an ISO Lumen rating is the result of a rigorous, scientific process that measures the true, usable brightness of a projector as you would see it on screen. It is the gold standard for an honest, "apples-to-apples" comparison.
However, a true ISO Lumen rating is only the starting point. The number on the box doesn't tell the whole story. The human eye perceives a "bright" image not just from the intensity of the light, but from the contrast between the darkest and brightest parts of the picture. A projector with an extremely high ISO Lumen rating but poor contrast can produce a flat, washed-out image that feels lifeless.
True picture quality rests on four pillars:
-
Projector Light Output: The native capability of the projector's lamp or laser, accurately measured in ISO Lumens.
-
Ambient Light: The "enemy" of projection; any light in the room that isn't from the projector.
-
Projection Size: As the image gets bigger, the same amount of light is spread over a larger area, reducing brightness per square inch.
-
Projection Surface: The screen is not a passive backdrop; it's an active optical component that reflects and shapes the light.
Neglecting any one of these pillars will compromise the entire system, no matter how powerful your projector is.
Instantly Boost Brightness With Projector Settings
Before you touch anything else in your room, you must ensure your projector itself is configured for peak performance. Many are shipped with conservative settings that prioritize quiet operation or longevity over maximum image quality.
From "Eco" to "Dynamic": The Picture Modes
Your projector’s preset picture modes are the single fastest way to change its performance.
-
Cinema/Movie Mode: Prioritizes color accuracy (to standards like Rec. 709) for viewing in a completely dark room. This mode intentionally reduces brightness to achieve perfect colors.
-
Bright/Dynamic Mode: Pushes the light source to its absolute limit to combat ambient light. This mode maximizes the projector's ISO Lumen output, often at the expense of perfect color accuracy.
The difference can be staggering. A projector capable of 2,100 ISO Lumens might be calibrated to output 1,050 ISO Lumens in 'Cinema' mode while delivering its full power in 'Bright' mode—effectively doubling the usable light with a single setting change.
Disabling Power-Saving Modes
Nearly every projector has an "Eco," "Quiet," or "Low Lamp" mode. Disabling this is crucial for getting the brightest picture, but it's important to understand the consequence. Running the light source at full power generates more heat. In response, the projector's internal fans will spin faster to dissipate that heat, resulting in more audible fan noise. This is a normal and necessary trade-off for maximum performance.
Keep Your Projector Bright with Essential Maintenance
Over time, even the best projector's performance will degrade without regular maintenance. Dust and heat are the primary enemies of brightness.
-
Clean the Lens & Vents: A dusty lens can dim and soften the image. More importantly, clogged air vents and filters restrict airflow, trapping heat. This can trigger a self-preservation mechanism called thermal throttling, where the projector automatically reduces its own brightness to prevent overheating. Regular cleaning with a soft brush and vacuum is vital.
-
Know When to Replace a Lamp: Unlike lasers, traditional projector lamps have a finite life and degrade noticeably over time. Towards the end of its rated lifespan (typically 2,000-6,000 hours), a lamp may be putting out 50% or less of its original ISO Lumen rating. If your lamp-based projector seems dim and yellowed, a new bulb is the most effective way to restore its out-of-the-box performance.
-
Don't Forget Firmware: Manufacturers periodically release firmware updates. While these won't physically make your light source brighter, they can fix bugs in how the projector processes the image, especially for complex signals like HDR, leading to a better, more vibrant picture.
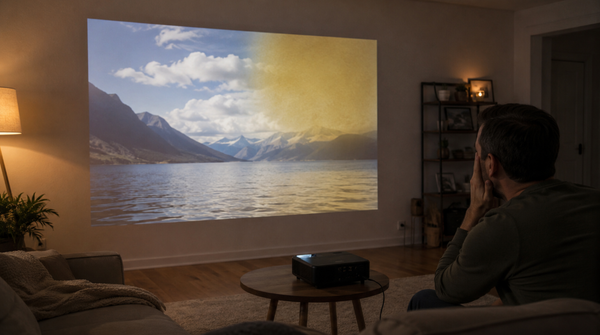
Control Your Room to Maximize Picture Quality
After optimizing the projector, turn your attention to the room. This is where the most dramatic gains are often found.
There is a critical distinction between a "light-controlled" room and a "light-treated" room.
-
Light Control is the baseline: using blackout curtains to block windows and turning off lamps. This is the minimum requirement for a decent experience.
-
Light Treatment is the next level: managing the projector's own reflected light. In a room with white walls, light from the projector hits the screen, then bounces off and illuminates the walls and ceiling. This stray light then reflects back onto the screen, raising the black levels and making the image look washed out. Treating your room with dark, non-reflective paint or materials preserves the deepest blacks and allows the projector to achieve its maximum potential contrast.
Choose the Right Screen for a Brighter Image
Projecting onto a wall is a significant compromise. The screen is an active optical tool designed to maximize image quality. For a truly optimized system, especially in rooms with any ambient light, selecting the right screen is critical. Learn more in our guide: Comparing Projector Screen vs. Wall: Which Is Better.

A High-Contrast Gray screen, for instance, can be a powerful tool. By absorbing some light, it lowers the "black floor" of the image, dramatically increasing the perceived contrast ratio. For a bright projector with weaker native contrast, this can make the image appear far more dynamic and subjectively "brighter" than a standard white screen. Learn more in our guide: Gray vs. White Projector Screen: Which is Better.
The UST Projector & ALR Screen: A Symbiotic Relationship
For Ultra-Short Throw (UST) projectors, which sit just below the screen and project light upwards at a steep angle, the screen choice becomes even more crucial. Their unique projection angle makes them extremely vulnerable to ambient light.
In this scenario, using an Ambient Light Rejecting (ALR) screen is essential for achieving optimal performance in anything but a completely dark, light-treated cave. An ALR screen is a piece of optical technology.
How ALR/CLR Screens Work: These screens feature a microscopic surface structure—often a series of horizontal, sawtooth-like ridges (Lenticular) or concentric micro-prisms (Fresnel). This structure is precisely angled to reflect the light coming up from the UST projector directly to the viewer, while simultaneously absorbing light hitting it from other angles, like a ceiling lamp. Learn more in our guide: ALR vs CLR Screen: Which Do You Need.
The result is a projected image that retains its contrast, color saturation, and brightness even in a well-lit room. This technology is what enables a 120-inch UST projection system to rival a high-end television.
Choosing between screen types is a key calibration decision. As an example of this synergy, AWOL Vision offers distinct ALR (Ambient Light Rejecting) screen technologies engineered for different rooms and use cases. This allows a user to create a high-performance system perfectly matched to their home.
-
For rooms with significant ambient light, such as a living room, the Daylight ALR Screen is the ideal choice. It uses Fresnel lens technology with a high gain (up to 1.5) to reject 85% of ambient light from the sides and above, producing a bright, punchy image even during the day.
-
For more controlled environments like a dedicated home cinema or a dark media room, the Cinematic ALR Screen is engineered to maximize contrast and color fidelity. It uses a surface with 95% ceiling light rejection and a more moderate gain (0.8) to preserve deep black levels and provide a wide 170° viewing angle, creating a truly immersive, cinematic experience without hotspots.
This level of system-matching—choosing a screen based on its optical properties and your room's specific lighting conditions—is the hallmark of a high-performance setup.

Solve Advanced Picture Problems: HDR and HDMI Fixes
If you've done everything right and the image still isn't perfect, these two advanced issues could be the culprit.
The HDR Problem: Why "Better" Can Look Dimmer
High Dynamic Range (HDR) content is mastered on professional monitors capable of brightness levels far beyond what any consumer projector can produce. To display it, your projector must perform tone mapping—compressing the massive brightness range of the source material. If handled poorly, the projector will often dim the entire picture to avoid "clipping" the very brightest highlights, making most scenes look too dark.
-
The Solution: Higher-end projectors and external video processors offer Dynamic Tone Mapping, which analyzes the image frame-by-frame and adjusts the brightness on the fly, producing a consistently vibrant HDR image that preserves the director's intent.
The HDMI Cable: Your System's Data Superhighway
A low-quality HDMI cable can be a bottleneck for a 4K HDR signal, which requires immense bandwidth (18 Gbps or more). If the cable can't handle the data load, the source device will compress the signal, often by discarding color information (chroma subsampling). This results in a less saturated, less precise image.
-
The Solution: For any 4K HDR system, use a certified "Ultra High Speed" HDMI cable rated for 48 Gbps to ensure your projector is receiving the full, uncompromised signal. Learn more: HDMI 2.0 vs. 2.1: Practical Guide for Your 4K Home Theater.
Conclusion: Your Brightest Picture
Getting a vibrant projector image is about combining the right settings, a well-chosen screen, and a controlled environment.
With your brightness now optimized, the next step is perfecting the image clarity. Learn more in our guide, How to Make Your Projector Clearer: Expert Tips That Actually Work, and create a truly cinematic experience at home.

Be the First to Know
Subscribe for special deals, news, and important product information, and get your exclusive $50 discount.
Related Articles
How to Connect an iPhone to a Projector: A Step-by-Step Guide (Wireless & Wired)
How to Reset Chromecast: The Ultimate Troubleshooting Guide
The Summer of Soccer Is Here — Is Your Backyard Ready?
The Ultimate Guide to World Soccer Match 2026
Projector Shelf: How to Choose, Install, and Get the Best Picture